how to swatch

"WARNING: Always test on a small patch and wait 24 hours before proceeding!" How many times have we seen that old warning on consumer products and blown it off? After all, we want purple hair now, not 24 hours from now!
But just like how a major allergic reaction to purple hair dye can ruin your teenaged life, failure to swatch can ruin the best of knitting projects. After countless hours of work, lovingly sourcing the precious materials, googling technique videos, weaving in ends, the garment doesn't fit right. It immediately goes into the mending pile to figure out what went wrong, or into the recipient's storage, only to be worn grudgingly when you visit.
But unlike the manufacturers of those consumer products, we designers of knitting patterns are not just warning you about gauge for the one-in-a-million chance of something going wrong. This is essential information for the success of your project. So I'd like to spend a few minutes getting into the why's and how's of swatching, to help ensure success with every project.
First, some of the why's:
1. There is no such thing as a standard gauge or tension!
That's right, folks. We're all just drawing from personal experience here. What needle size a pattern recommends is often just what the designer themselves used, and that designer may have a tighter or looser tension than you, and that's okay! Whether you use a size 3 or size 13 to get the pattern's gauge, it doesn't matter, as long as you get the gauge.

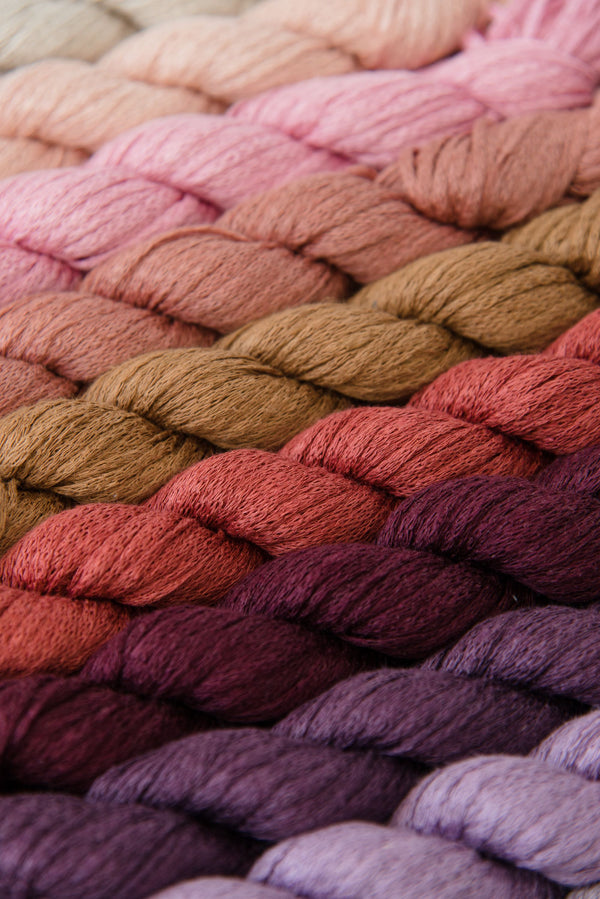
Above: Every knitter has different tension, and even using different needle materials can make a difference! These swatches all use Quince and Co. Lark and US size 7 (4.5 mm) needles, and have the same number of stitches and rows, but are all different in size. Group 1 was knit by Tara with wooden needles (top), and with metal needles (bottom). Group 2 was knit by Emma with wooden needles (top), and with metal needles (bottom). Group 3 was knit by Beth, Nichole, Susan, and Angela, all on metal needles.
2. Your tension can change over time, or even in the middle of a project!
For the longest time, I knew that if I worked with a size 7 needle, I'd get 4.5 stitches per inch. Size 6 was 5 stitches to the inch, size 8 was 4, and so on. I was so consistent for awhile that I got very complacent about swatching, and thus did my mending pile grow as my tension shifted over the years.
And when you're working with minimally processed wool yarns like many of Quince's and Stone Wool's offerings, your gauge can change significantly after the swatch is blocked. So a quick little 2-inch, 4-row swatch that's quickly unraveled before casting on WILL lead you astray.
3. Forewarned is forearmed!
Swatching is a great time to get acquainted with a new yarn, pair of needles, or stitch pattern, if it's given, before the main event. If you find yourself piercing the yarn too many times, you can switch to blunter needle tips. If the fiber drags too much on wood needles, you can switch to metal. If you aren't sure how to work the cast on or a special maneuver in the stitch pattern, this is a good place to practice. Think of your swatch as a rehearsal for your main project. It's the place where all the different elements of your project can come together to figure things out.
4. A small difference in gauge can make a HUGE difference in your garment!
Say you're making a sweater that promises a 40-inch finished chest measurement and calls for 16 stitches = 4" (or 4 stitches per inch). You make a nice-sized swatch, wash it, block it, let it dry, measure it. Hm, 17 stitches = 4" on your swatch, no matter where you measure it. That's 4.25 stitches per inch. Well, that's close enough, right? So you cast on the 160 stitches to make the body of your sweater, like the pattern says. Those 160 stitches, which would be 40 inches with the correct gauge, now measure just 37.5 inches around at 4.25 stitches per inch. A much tighter fit that you expected!
So now that you understand a little more about why doing a gauge swatch is really important, not just something you're "supposed" to do, here's a full guide to making a good swatch that leads to total success.
1. Make it big enough!

Above: Quince & Co. Puffin using US size 11 (8 mm ), 13 (9 mm), and 15 (10 mm) needles.
There's a reason that Quince patterns give a gauge over 4 inches, and it's not just because fractions are fiddly. Hand knitting is by its nature slightly inconsistent for everyone. An average of many stitches and many rows will give a more accurate result than a smaller swatch. For accuracy, always cast on at least 4 inches worth of stitches according to the pattern gauge (6 inches is even better), plus a few extra stitches as selvedge (your edge stitches will behave a little differently than the main body of your swatch, so best not to count them). Unless you know your tension is much tighter or looser than average, you can start with the pattern's suggested needle size and adjust later if necessary.
So if the pattern states:
Gauge: 16 sts and 24 rows = 4" [10 cm] in St st on larger needles or size needed to get gauge
I recommend casting on at least 16 + 4 sts = 20 stitches total. 16 to serve as the stockinette stitch main swatch, with two stitches on each side in garter stitch to act as a selvedge.
How long should you make it? Again, at least 4 inches long, plus a few edging rows to smooth out a tight bind off or cast on edge. If the pattern features a ribbing or other edge pattern you're unfamiliar with, you can also try it out here on your swatch.
If your pattern gives a gauge worked in the round, you should swatch in the round. This will be great practice for Magic Loop method if you like, but it can also be worked on double pointed needles.
You may also want to note the gauge BEFORE washing, in case it changes significantly. You can use this pre-washed gauge to compare to your knitting later to avoid unpleasant surprises after blocking.
2. Wash it!

Above: Puffin swatch soaking in warm water and Twig & Horn's Wool Soap.
You don't have to weave in the ends (unless you plan to use it for something), but you do have to bind off, wash and block your swatch to get an accurate measurement. If you suspect that you haven't reached the pattern's gauge yet, you can create multiple swatches on different needle sizes and block them all at once, or create a long, scarf-like swatch with the different needle sizes divided by rows of garter stitch. Just make sure you note which swatch is which!
To wash your swatch, treat it the same way you will your finished object. For most projects, that means a nice long soak in a basin of warm (not hot) water and a high quality soap like Twig & Horn's Wool Soap. For many wool soaps like this, rinsing isn't necessary, but if you do decide to rinse, soak again in clear water that was the same temperature as the first soak.
3. Let it dry!

Above: Larger towels can be folded around the swatch before rolling to help absorb more water.
Gently squeeze out the water without twisting or wringing the swatch, then roll it up in a towel to squeeze out even more water.
If your project is relatively small, or should take a particular shape, let it lay flat in its final shape. If your project is large, heavy, and is subject to gravity in its final form (i.e. hanging on a wall or on your shoulders) that long swatch of multiple needle sizes comes in handy! Let it hang from the horizontal bar of a clothes hanger, or some other surface parallel to the floor, so you can see how the weight of the garment might affect the gauge.

Above: Puffin swatch hanging to dry.
Did you know that wool can absorb up to 30% of its weight in water without feeling wet? Give it time and make sure your piece is completely dry before measuring!
4. Measure it!
The best tool for measuring gauge is a solid piece of material the won't warp with time and which clearly delineates the area being measured, like the Twig & Horn Square Gauge Ruler. Old tape measures can get worn and stretched, especially at their ends, so if you use one, I recommend measuring from the 10" mark to be a little more certain, at least within a negligible distance.

Above: Counting stitches and rows is easy using the window of a specially designed gauge ruler.
Start inside the selvedge stitches and measure how many stitches are in 4 inches. Measure a few different rows of stitches near the middle of your swatch. If they vary from row to row, use the more common gauge in your swatch, or find the average among your different measurements.
Next, measure the number of rows in 4 inches, taking an average of several measurements if you find that they vary.
5. Adjust needle size if necessary!
If you haven't reached the pattern's required gauge yet, try a larger or smaller needle and repeat the steps above. Remember that a LARGER needle creates LARGER stitches. When stitches are LARGER, there are FEWER of them in an inch. Imagine how many Great Dane dogs might fit on a sofa. Now imagine how many Chihuahuas might fit on the same sofa. That's a lot of Chihuahuas!

6. Remember to re-check your gauge as you work on your project!
When you find the right needle size for your project, you're ready to cast on with confidence. Just remember to check in with your gauge from time to time, especially if you've been knitting during tense situations or especially relaxing ones. A trusty set of interchangeable needles like the Lykke Cypra set can help you stay on gauge whether you're knitting during a horror movie marathon or a beach vacation!
Happy Knitting!
-Kirsten
11 comments
I didn’t even know what swatching was when I picked knitting back up 3 years ago after a 15-year break. Got swept away in lust again with all the new types of yarn, especially soft wools and superwash, all the indie dyers, and colors to get lost in.
I skipped the gauge part on my first sweater and it turned out to be a cozy tent. Then I swatched but didn’t wet block, which resulted in better knitting but still off. I dreaded knitting because of the damned swatch but I did want stuff to fit, especially for gifts. So I changed my attitude and made it into a game of “What Will Happen This Time” and keep the swatches for ? A cool lap rug Could be!
Anywho, now I kind of enjoy swatching and am proud when a project actually looks like the pattern picture and meets the measurements. I purchase an extra unit of yarn for experimenting with and label the swatches so I know how I got there.
Sometimes I can’t hit the row gauge no matter what I do but get the stitch gauge, Grrrr! Then I follow hints about adjusting the math and try to remember this while I create.
There are so many helpful pages, videos, and blogs out there now, which this leftie really appreciates, and I thank you for taking the time to remind us all of how swatching is a very essential part of our art, and that we are not the only ones who have knitted tents or sweaters that won’t go over our heads.
I Will continue to swatch and one day I will hit perfection, and have a cool lap rug too!
Thank you.
Thank you. This is the best “tutorial “ I’ve seen. I’ve noticed the difference between needle materials but thought it was my tension and not the needle. I never considered hanging my swatch!
Great information.
This was extremely helpful- I almost always make a swatch but never added selvages to it. I also like the idea of knitting a “scarf” swatch. I read once that tying knots that correspond to the needle size in the tail of yarn left when casting on, is a great way to remember the needle size used in the swatch.
Well written and excellent advice for any knitter !
Thanks for stressing the importance of doing a swatch. So nicely done.
Wow! I know a picture is worth a thousand words, but that first photo with all the swatches, for me, really drove the point home. In my head, I’ve historically been a pro-swatcher. In reality, I’ve only been a 75% pro-swatcher, but that photo has convinced me to give myself fully to the dark side of being a100% pro-swatcher both in my head AND in reality. Thanks for such an impactful illustration!
Thanks for NOT showing swatches blocked with pins. It’s too easy to squish or stretch a swatch into perfect gauge. You mentioned noting the pre-wash gauge in section 1. I think it’s worth emphasizing again in section 6 that when you check gauge periodically during a project, you should be using that pre-wash gauge, unless pre and post are the same. Great Danes and Chihuahuas! That’s going to stick! I’m actually good at math but sometimes wander off course with gauge . . . Great Danes and Chihuahuas. Thanks.
I really liked this article. I am going to start a cardigan in September or October using really nice and expensive yarn, so I don’t want to mess it up. I have made afghans, hats and shawls previously and I am working on my 2nd pair of socks. My gauge has been pretty good so far. I need to buy some wool wash and invest in blocking boards too. Thank for all the information.
Dawn
Thank you for explaining the importance of swatching. I’m a firm believer in it, but have found swatches can lie!
I love the dogs and sofa analogy, it explains it so well. I always have to think about needle size and stitches, never again! Thank you!
Thank you for your piece on “How to Swatch.” I almost never swatch and now I REALLY understand why it is so necessary (I thought I was just a tight knitter). I often have to think twice on whether to go to a larger or smaller needle. I will definitely remember your comparison of Great Danes to Chihuahuas on a couch!
So handy! I honestly always skipped the swatch before, I was too excited to start the new project. Totally makes sense now how I’m the end I would have been so much happier with the finished piece if I had just taken a couple minutes to do the swatch. Thanks!